If a coach uses the same basketball shooting drills over and over again at practice, there are two main things that will happen...
- The team will get bored.
- The team will stop giving 100%.
No coach wants either of these things to happen.
Having a variety of shooting drills to use will make you a better basketball coach and will keep your players excited and interested during your practices.
All basketball shooting drills below contain a downloadable and printable PDF with full instructions on how to setup and run the drill, variations, scoring systems, and coaching points to remember.
Here are 20 team basketball shooting drills that you can use to keep practices fresh and help your team shoot at a higher percentage.
20 Basketball Shooting Drills
Drill #1 - Hand-Off Shooting Drill
How the Drill Works:
Players at the top of the key dribble down and perform a handoff with a wing player cutting to the top of the key who then takes the shot or drives for the layup.
Purpose:
To work on shooting off hand-offs and performing them as they can be tricky for players to master unless drilled often.
Setup:
- Two lines at the top of the key. Both have two basketballs in each line.
- One line of players on the lower end of each wing.
Instructions:
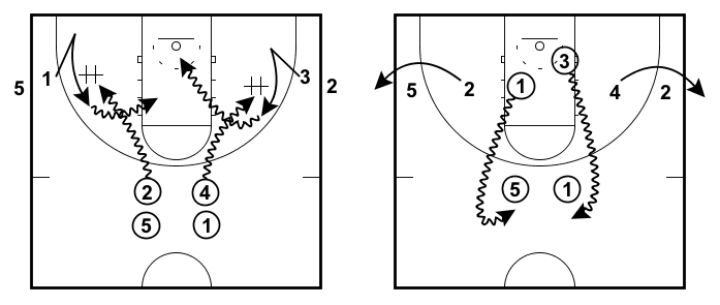
- The first players from the top of the key dribble down to the wing on their respective sides. At the same time, the wing player should be making cut towards the baseline.
- Making sure to change speeds, the wing player explodes up towards the wing and receives the hand-off and performs a certain shot.
- The person that hands off the basketball joins the end of the wing line.
- The shooter rebounds their basketball and then joins the line at the top of the key on the opposite side from the one they shot from.
- The drill is run for about 5 minutes.
Variations:
Shooter - Step back and shoot without dribbling, one-dribble pull up from the elbow, two dribble attack the rim for a layup, drive baseline as if the defender cheated under the screen.
Competitive - If you want to add a bit of competition to the drill, set a target amount of makes for the team to reach within a certain time limit.
Distance of Hand-Off - You can run this drill with the players performing the hand-off at the threepoint line, mid-range, or even closer for younger players.
Drill #2 - 23 Cones Shooting Drill
How the Drill Works:
Place 23 cones at the baseline of one end of the floor and split the players up into two teams at the other end of the floor. Players shoot and are ‘rewarded’ by being allowed to go to the other end of the court and have a chance at collecting a cone if they make another shot. If they miss, they get nothing and return to the end of their line. The team with the most cones at the end of the game wins.
Purpose:
It’s a fun variation to a normal shooting drill that keeps players interested and excited. Players are shooting under a lot of pressure on the second shot.
Setup:
- Place 23 cones at the opposite end of the court.
- Split your group up into two teams.
- One basketball per team.
Preferably, there should be a coach/parent to pass and rebound for each team on the second shot end of the floor.
Instructions:
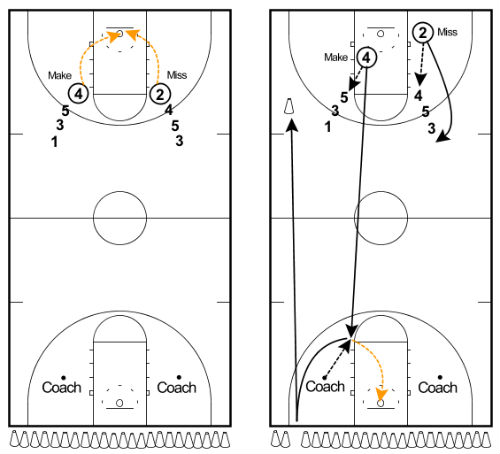
- Players start shooting on the coach’s whistle.
- On every make by a team, the person who shoots must rebound the ball and pass it to the next person in line, then they are ‘rewarded’ by sprinting to the other end of the floor and get the opportunity to shoot a three-pointer to win a cone for their team.
- The player only gets one attempt. If they miss, they get nothing and return to their group. If they make it, they get to collect a cone for their group.
- The player then places the cone in their teams ‘safehouse’ near their line and joins the end of the line.
Scoring System:
- The team that finishes with the most cones at the end of the game wins!
Variations:
Increase or Decrease Cones - I’ve used this drill with both 13 or 33 cones as well. Use any number of cones as long as it’s an odd number so there’s a winner.
Shooting Position - Usually adults will shoot three-pointers but youth teams can shoot from the elbow or anywhere else on the floor.
No Second Shot - If I’m coaching young youth players, often I don’t ask them to make a second shot at the other end of the floor. They simply have to sprint down to the other end and get one.
More Groups - Instead of playing with only two groups, you can create up to 4 groups and place the cones in the middle of the court instead.
Drill #3 - Pressure Jump Shots
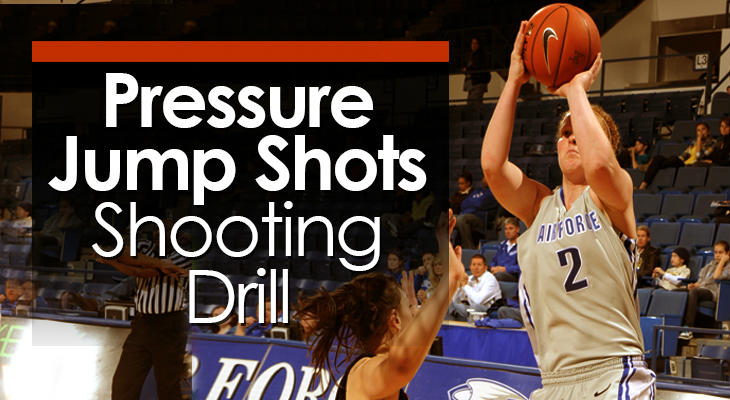
How the Drill Works:
Players must complete eight shots (two from each high post) while under the pressure that if they miss the shot they have to join the same line and try again.
Purpose:
Allows players to practice shooting open jump shots while under mental pressure.
Setup:
- 4 lines of players on each elbow. Can be as many players as you like.
- 4 basketballs. One with the first person in each of the lines.
Instructions:
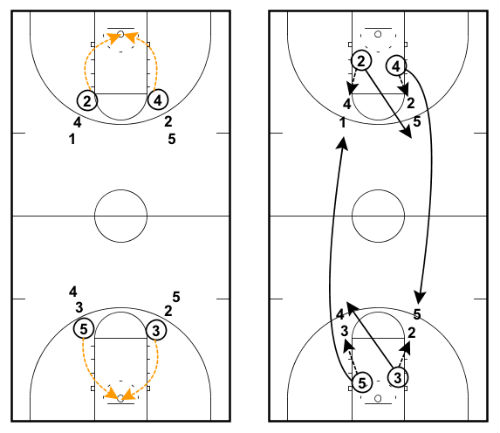
- When the coach says to start, the first person in each line takes a shot and returns the ball back to the same line.
- If they make the shot they move to the next line, if they miss they join the same line to try again.
- This process continues until a player has made a total of eight shots.
Scoring System:
- Each player counts their own amount of makes until they reach eight made shots (make two shots from each elbow).
- You can decide whether to stop after there is a winner or keep playing until everyone is finished depending on the amount of time you have.
Variations:
Shot Distance and Location - Change the shot distance depending on age and put cones where you want the four shots taken from. I have used this drill with very young youth players and shot from the block and with older players shooting from the three-point line.
Swishes Only - A tough variation of this drill that I’ve used before is that only swishes count. This should be left to the more advanced teams, but it does make this drill interesting!
Drill #4 - Speed Shooting Drill
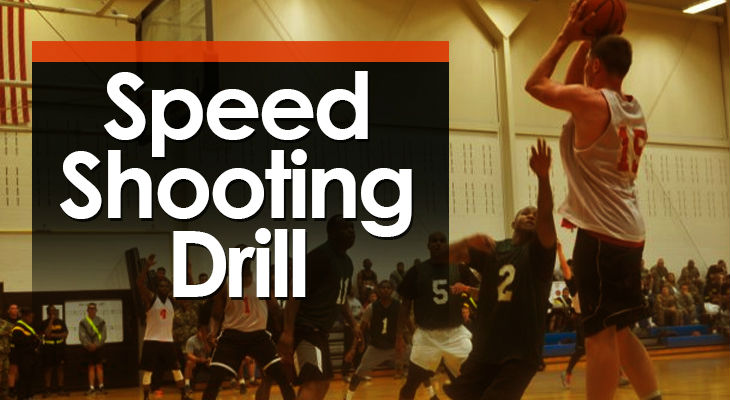
How the Drill Works:
Three groups line up along the baseline. The first player in the group sprints the floor with the ball, pulls up for a shot, rebounds, then sprints back down the other end and shoots, rebounds, and passes to the next player in line.
Purpose:
This drill makes sure the players are fatigued when shooting the basketball and works on players learning to decelerate and be on balance when shooting the ball.
Setup:
- Split the team up into no more than 4 groups (3 works best).
- Best run with 3 or 4 players in each group.
- Each group has one basketball.
- Spread the groups out evenly along the baseline.
Instructions:
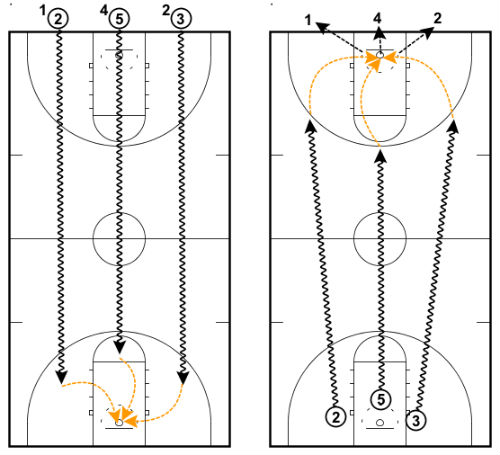
Players will either shoot a three-point shot or a mid-range shot.
- On the coaches call, the first player with the ball sprints to the other end of the court with the basketball before pulling up from either behind the three-point line or from mid-range.
- Upon shooting, the player rebounds their own shot and sprints to the other end before pulling up and shooting again.
- They then rebound their own shot and pass it to the next person in line. The next person cannot move from the start until they receive the basketball.
- The next player repeats.
Scoring System:
Group Scoring - Each group keep their own score for a certain amount of time.
or
Total Scoring - First team to reach a certain amount of makes wins.
Variations:
Shooting Distance - If you have a weaker shooting team you can have them pull-up from midrange instead of the three-point line.
Number of Groups - Groups should contain no more than 4 players and there should be no more than 4 groups at one time.
Drill #5 - Off the Dribble Form Shooting
How the Drill Works:
Players practice the 1-2 step or the hop two times with a pump fake and then use the 1-2 step or the hop to shoot a jump shot on the third use of the footwork.
Purpose:
To teach players to shoot off the dribble using either the 1-2 step or the hop with the correct
footwork and while balanced. A great drill for players that are usually off balance when they shoot after dribbling.
Setup:
- Every player must have a basketball.
- Three lines a couple of metres out from the three-point line.
- Similar number of players in each line.
Form Instructions:
1-2 Step Shooting Form
- Players start each rep in the triple threat stance.
- Players bounce the ball at the same time that they step with the dominant shooting foot (right foot for right handers and left foot for left handers).
- Gather the basketball by planting the non-dominant shooting foot (which is now their pivot foot) and then shoot as they step through with their dominant shooting foot.
Example - Right Handed Player
- Start in triple threat stance.
- Bounce the ball at the same time as they step with their right foot.
- Gather the ball by planting the left and then stepping up with the right foot before shooting.
The Hop Shooting Form
- Players start each rep in the triple threat stance.
- Players bounce the ball at the same time that they step with either foot (personal preference).
- They then push off the foot they stepped with into a small hop and land with both feet at the same time before raising up for the shot.
Example - Right Handed Player
- Start in triple threat stance.
- Bounce the ball at the same time as they step with either foot.
- Perform a small hop and gather the basketball in the air.
- Land with both feet at the same time and raise up for the shot.
Instructions:
- The first thing you must do is show the players the correct footwork to use using the form instructions above.
- The first player in each line practices the form 3 times. The first two times end in a pump fake and the third time ends in a jump shot.
- After receiving your own rebound join another line.
Variations:
Add More Lines - If you’ve got a large amount of people you can add more lines so that players can have more repetitions. Try not to have too many though because it makes it hard for the coaches to watch and make corrections to form.
Use the Hop or the 1-2 Step - Teach the players how to shoot using both and then I believe that you should let each individual player decide which one feels more comfortable to them.
Distance - Adjust the distance away from the ring so that on the third use of the footwork when players shoot, they’re shooting from a comfortable distance.
No Line Rotation - If they players get confused or the lines keep having an uneven amount of players, consider telling players to return to the same line after each shot instead of changing.
Drill #6 - Weave Layups
How the Drill Works:
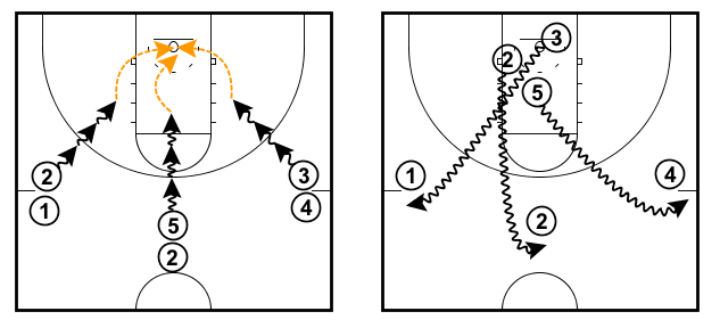
Players weave from half court ending in a layup by a wing player. The middle player rebounds the ball, outlet passes, and then the ball is back to the start.
Purpose:
A fast paced drill that works on passing and layups while at full speed and under time pressure. A great drill to get the intensity up at training.
Setup:
- Three even lines at half court with at least two players in each. Can be as many more as you have.
- One basketball in the middle line.
Instructions:
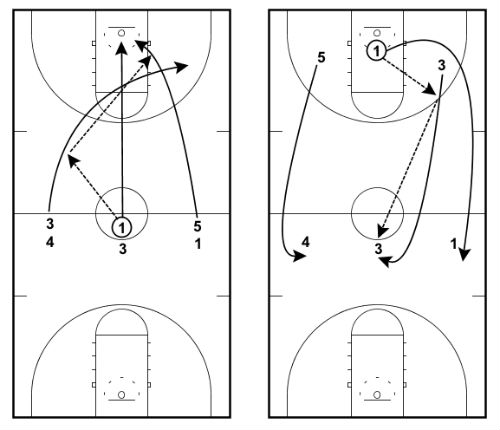
Instructions for doing this drill for a right hand layup. Reverse everything
for left hand.
- The middle line player passes the ball to the player running down the left wing who immediately passes it to the player running down the right wing for a layup.
- Immediately after the left wing player passes the ball they must sprint across the court and get ready to receive the outlet pass.
- The middle player who started the drill runs down the middle and rebounds the ball after the right wing has performed a layup and continued through.
- The middle player then turns and passes the ball to the outlet player who catches and immediately passes to the next person in line in the middle line at half court.
- As soon as the middle player catches the ball the next group repeat the same process.
Scoring System:
- The team competes against the clock to make as many layups as they can in a certain amount of time.
- The drill is run for 2 - 3 minutes.
Variations:
Left Hand - Reverse the whole drill and have your team perform the drill with a left hand layup instead of right hand.
Shoot from the Block - Instead of a layup players take a jump shot from the block. I wouldn’t recommend shooting from much further out or the rebounds will be too long and it will ruin the drill.
Drill #7 - Cincinnati Layups
How the Drill Works:
A line of players at half court and on the wing, and a single player on the free-throw line. The player at half court passes to the player at the free throw line who then passes to the cutting wing player for a layup.
Purpose:
This is a great warm-up drill for young players that works on layups and passing skills. Also great for concentration as we emphasize that the ball should never hit the floor.
Setup:
- A line of players in the middle of half court, a line of players on the wing, and a single player on the free throw line.
- You will need one or two basketballs all starting with the half court group.
Instructions:
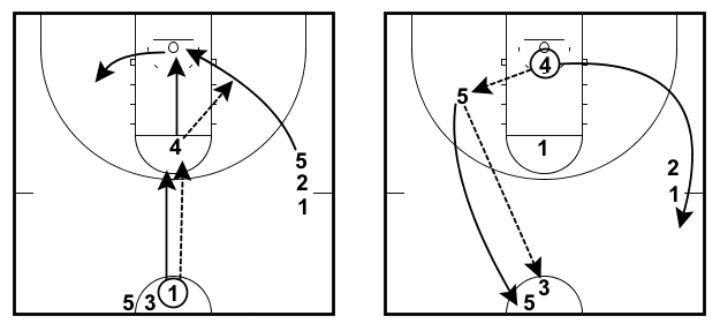
- The first person with a basketball in the half court line passes it to the player on the free throw line and then immediately runs to the free throw line to replace them.
- The player that receives the first pass at the free throw line passes to the wing player who should be cutting hard to the ring. The wing player should receive the ball and do a layup without dribbling the ball.
- After the wing player performs a layup, they keep running through to be used as an outlet pass.
- The person that passes from the free throw line to the wing player rebounds the ball, outlets to the same player that did the layup, and then runs to the layup line.
- The player that receives the outlet pass passes it to the half court line and then joins the end of it.
Variations:
Competitive - Players must make a certain amount of layups in a row. This puts a lot of pressure on each layup.
Other Side of the Floor - If you started the drill on the right hand side (players finishing with their right hand), then switch the wing line to the other side of the floor so the players must finish with their left hand.
Jump Shots - Instead of layups players can pull up for a jump shot. Shots from the block are fine, but problems start if you shoot much further out because the drill relies on the shooter being the outlet pass on the other side of the floor.
Drill #8 - Give and Go Shooting
How the Drill Works:
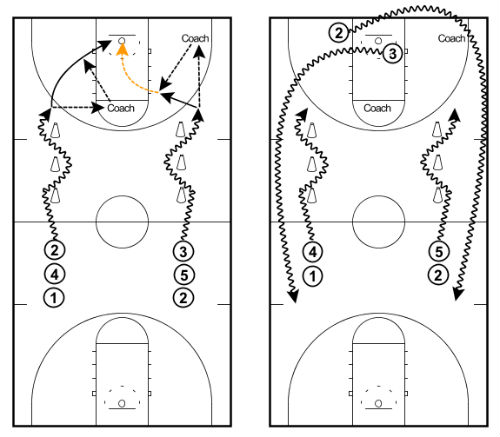
Players weave in and out of the cones, pass to the coach, receive the ball back, and then shoot a variety of shots off the catch switching sides each time they shoot.
Purpose:
To work on dribbling skills, footwork off the catch and a variety of shots.
Setup:
- Every player has a basketball.
- Two coaches.
- Two lines on the half-way line on either side of the court.
- Optional: 3 cones near half way for dribbling practice.
Instructions:
Drill shooting options:
- Catch and shoot
- Catch, pump fake, shoot.
- Catch, pump fake, drive.
- Catch and drive.
- Catch, one-dribble pull up.
- and any others you can think of.
- The coach must first tell the players which shot type they’re going to work on first.
- On the coaches call to start, the first player starts weaving in and out of the cones.
- At the end of the dribbling the player either makes a two-handed chest pass to the coach or a 1-handed push pass depending on age and skill level.
- The coach catches and passes back to the first player who then performs the chosen shot.
- As soon as the coach has passed to the player the next person in line starts dribbling.
- After the shot the player rebounds their own shot and dribbles up the opposite sideline to join the opposite line.
Variations:
No Dribbling Cones - If you simply want to focus on the footwork part of the drill then you can take out the cones.
Use the Full Court - If you have 4 coaches (or parents) you can increase the number of shots each player will get by running 4 stations instead of two. Have the players rotate clockwise each time they shoot.
Competitive - The first players to make a certain amount of shots from each spot is the winner.
Drill #9 - Screen Shooting
How the Drill Works:
Players will start at the top of the key and start the drill by cutting down the lane until they’re under the basket. From here they will cut off one of the screens and receive a pass from the next player in line before taking a shot. They then rebound their shot and return to the line at the top of the key.
Purpose:
This drill will teach your players how to use different cuts off an off-ball screen and to practice scoring off those cuts.
Setup:
- Two chairs or cones to act as the screen on both sides of the floor.
- All players lined up at the top of the key.
- Everyone has a basketball except the person at the front of the line.
Instructions:
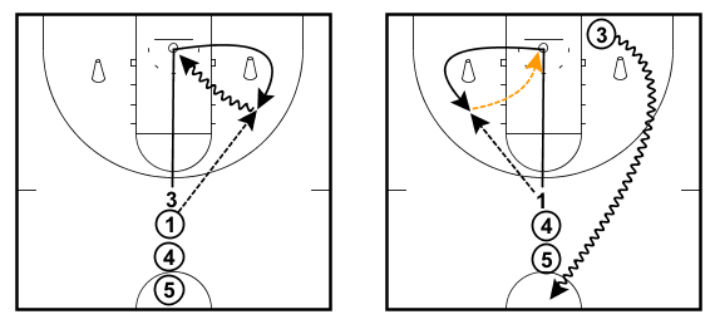
The 4 main cuts off the screen are:
- Flare cut
- Straight cut
- Curl cut
- Backdoor cut
- Instruct the players which cut they should be using off the screen. You can run 1-2 minutes of each cut or let them choose themselves.
- To start the drill the first player cuts directly underneath the basket before changing pace and exploding out to use one of the screens. The next person in line passes to the shooter coming off the screen.
- After the shot the player that passed the ball then becomes the cutter and uses the screen on the other side of the floor before receiving a pass from the next player in line.
- This process continues for about 5 minutes making sure to regularly change the type of shot the players are taking.
Variations:
Two Lines - If you have a lot of players, instead of running one line in the middle of the floor you can create two lines at the top of the key. This means each group sticks to their own side of the floor and runs off the same screen every time.
Different Cuts - Make sure you’re varying the shots between the four different cuts listed at the start of the instructions section.
Competitive - If you want to make it competitive you can make it a game by setting a target number of makes and the first player to reach that number wins.
Drill #10 - Partner Form Shooting
How the Drill Works:
Players each have a partner and line up about 10 feet apart facing each other. They then shoot the ball to each other using correct technique so that their partner can catch it without moving.
Purpose:
This drill should be used almost every training at a young age until each player has mastered basic shooting technique. It’s a great drill to get in many quick repetitions and gives the coaches a chance to correct the shooting form of all players.
Setup:
- Players all find a partner.
- Players line up about 7 - 10 feet from each other or on two parallel lines picked by the coach.
- One basketball between two players.
Instructions:
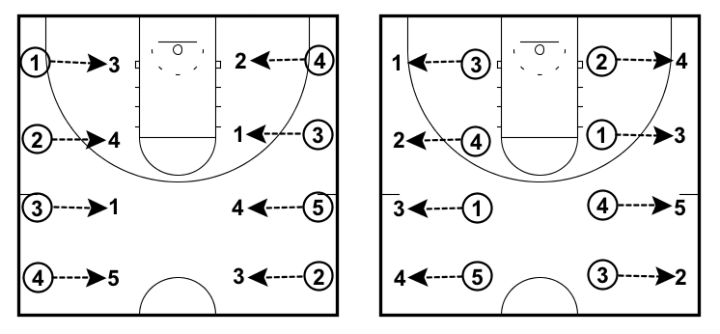
- The coach must first demonstrate how they want the players to shoot the ball. Make sure to emphasize the key shooting points.
- Players then shoot the ball to each other for the given amount of time.
- Coaches walk around all groups and evaluate and make corrections to each shooter individually.
Variations:
Odd Number of Players - When you have an odd number of players you can find a parent or spare coach to fill in and be their partner, or one of the players can perform the ‘line shooting’ drill, which is the same except they have to retrieve their ball after every shot.
Shoot with One Hand - Can run this drill using one hand only to shoot the ball. This ensures that players aren’t pushing the ball with their off-hand as well.
Drill #11 - 30 and 1 Shooting Drill
How the Drill Works:
Players will split up into groups and compete against each other. The coach picks three different spots on the floor that each group must make 10 shots from and then to finish the game the group must make one long-range shot as the game-winner. Equalling 31 made shots.
Purpose:
A fun, competitive shooting drill that works on shots from different spots on the court including a long-range game-winner.
Setup:
- Split players up into groups of preferably between 3 and 5 players. Though any number will work.
- Each group has one basketball.
- Tell the players the three spots they will shoot from before the half court shot. The traditional spots are 10 made shots from the block, the elbow, and the three-point line before the one made half-court shot.
Instructions:
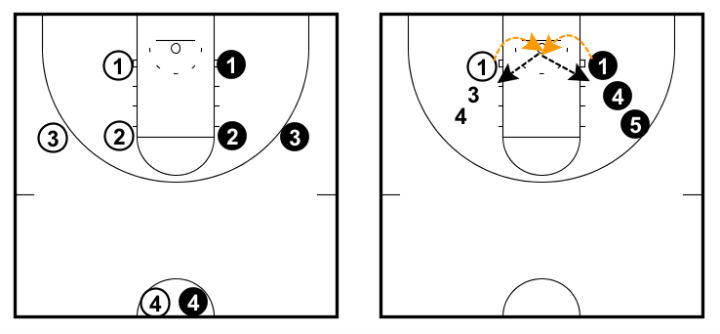
- On the coaches call, players start shooting from the first spot.
- The players rotate through taking their shot, rebounding, and passing the ball back to their line.
- Once the team has made 10 shots they move on to the next spot. The other team must keep shooting until they make 10 from each spot. All groups do not change when one team makes 10.
- The first team to make 10 from three spots and then make the long distance shot wins!
Scoring System:
- All shots are worth 1 point.
- The first team to 31 points is the winner.
Variations:
Shooting Spots - You can pick any three spots on the floor for players to shoot from, including:
• Layups
• Baseline
• Wing area
• Anywhere around 3-point arc.
• etc.
Long Distance Shot - The long distance shot is a great part of this drill because the players love it and it gives all groups a chance to catch up and win. If you have younger players you can make the three spots closer to the basket and then finish with a three-point game-winning shot or a halfcourt shot for older age groups.
Drill #12 - Chase Down Layups
How the Drill Works:
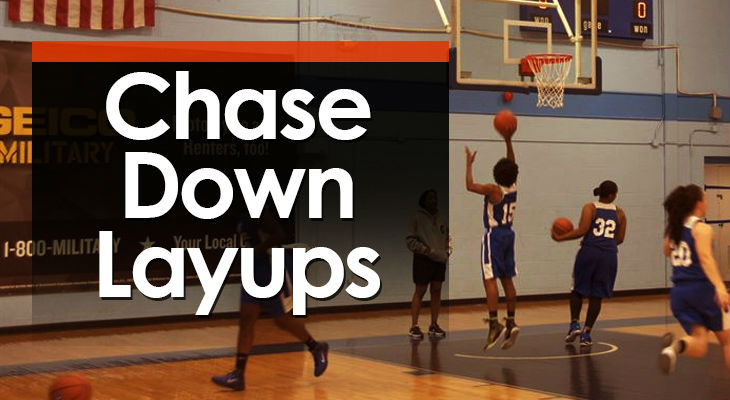
Two lines of players on the baseline at each end of the court. The offensive player starts with an advantage and sprints the court and must lay the ball up while under pressure from the defensive player.
Purpose:
To allow players to practice layups at full speed while under pressure from a defender. This drill also works on chase-down defense.
Setup:
- Two lines of players on the baseline at each end of the court.
- Players in the offensive line all have a basketball.
- A coach at each end of the court to start the drill.
Instructions:
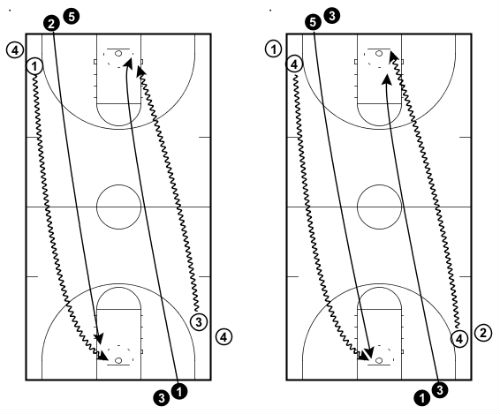
- Coach starts by bringing the offensive player out a few steps depending on how fast they are compared to the defense to give them the fast break advantage.
- On the coach’s call, the offensive and defensive players sprint the floor.
- The offensive player’s goal is to make the layup and the defensive player’s goal is to challenge the layup without fouling.
- After the make or miss, both players join the end of the lines at their current end of the floor.
Variations:
Opposite Side of the Floor - Perform the drill from the other side of the floor so that the players have to dribble and make a layup with their left hand.
Competitive - Play until a player makes a certain amount of layups.
Drill #13 - Fatigue Shooting Drill
How the Drill Works:
Players are in groups of 3 or 4. The drill involves each player passing the ball to a shooter, sprinting the floor, receiving a pass for the shot, and then rebounding their own shot to pass to the next person.
Purpose:
A fast-paced drill that allows athletes to practice shooting while fatigued. Great drill to improve conditioning in all players.
Setup:
- Players must be in groups of 3 or 4.
- In groups of 3 - A player on each baseline and a player in the middle of the court.
- If groups of 4 - An extra player behind one of the players on the baseline.
- Both players on the baseline have a basketball.
- Maximum of 3 groups on one court.
Instructions:
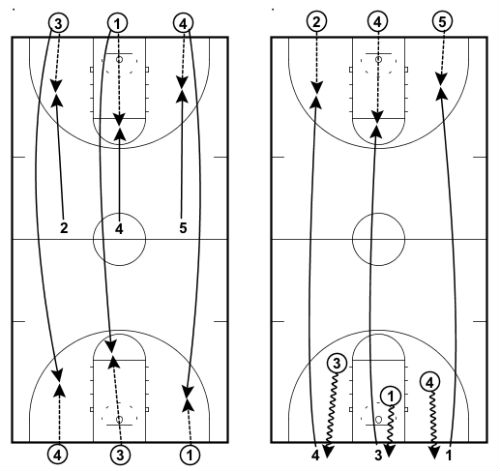
Instructions based on the drill being run with three groups of three players on a court.
- The three players in the middle of the court all sprint the same direction towards their partner. They receive the ball in shooting stance from the distance designated by the coach and take a shot.
- After the shot, the shooter rebounds their own ball and dribbles the ball out of bounds and waits to pass to the next player in their group.
- The player who passes the ball to the shooter immediately sprints down the other end of the court after passing and now becomes the next shooter.
- They will receive the pass off the player in their group at the other end of the court who will then sprint towards the original end to receive the pass from the first shooter.
- This cycle continues for 1 - 3 minutes before switching to a different type of shot.
Scoring System:
- Score as groups - The groups keep their own score and are playing against each other.
- Score as a team - All groups on the court count their score together and try to beat a targeted number. This requires the use of at least one coach down each end of the court to keep track of the amount of makes.
Variations:
Everyone has a basketball - This means that players will be full court speed dribbling into a shot instead of receiving a pass. The change over occurs when the player has taken a shot and got their rebound. Then the next player sprints down the other end.
Type of shot - You can run this drill using any of the following shots:
• Layups/Floaters
• Mid-range
• 3-pointers
• 1 dribble pull-up.
• 2 dribble pull-up.
Drill #14 - Tennessee Shooting Drill
How the Drill Works:
The ball starts under the basket. On every trip down the floor there will be two passes and a layup. The first two passers must switch sides of the floor and then take a jump shot from either the high post or three-point line receiving the ball from the players on the sideline. The player that performs the layup then initiates the next trip down the floor with the two players that passed the ball to the shooters.
Purpose:
A great drill for players to practice passing the ball ahead of them to a teammate running at full speed. It involves lots of shots at game speed and is great for basketball conditioning since the players must use quick bursts to sprint up and down the floor.
Setup:
- You need about 10 players or more for this drill.
- Five basketballs.
- Set up by placing one player below the ring at one end of the court, and two people out of court on both sides of each freethrow line extended. Refer to the diagram.
- The first person underneath the ring will need a basketball.
- The second players in the two lines closest to the player under the ring will need a ball. (This is because the person starting under the ring passes to the players at the front of these lines).
- And the first player at the start of each line at the other end of the court will need a ball.
Instructions:
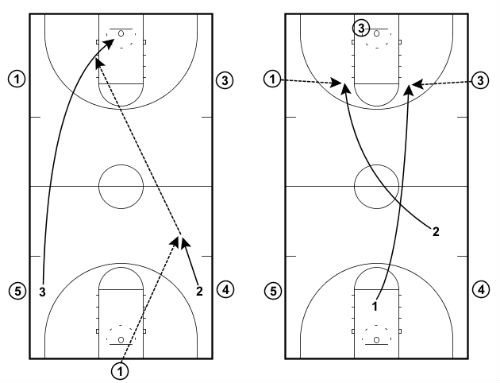
- The drill starts by (3) making an outlet pass to the first person in either line. For diagram purposes (3) passes to (4).
- (1) seeing this understands he will be performing the layup sprints the floor and receives the pass from (4) for the layup.
- After passing, players go to the side they passed the basketball to receive the pass for the jump shot. In this case, (3) receives the pass from (2) and (4) receives the pass from (5).
- (3) and (4) both take a jump shot from the designated area, collect their rebounds, and pass to the person at the front of their line.
- After completing the layup, (1) rebounds their own shot and now can outlet to either of the players that passed the basketball to the shooters.
- (1) outlet passes to (2) who then passes to (5) sprinting down the floor for the layup.
- (1) and (2) both sprint to the side they passed to and receive the pass for a jump shot.
- (5) now rebounds their own shot and starts the sequence again as (1) and (2) collect their rebounds and pass to the players at the front of each line.
- The drill continues like this for between 2 - 4 minutes.
Scoring System:
- 1 point per made shot. Either by the person performing a layup or the two shooters making a shot from the elbow. A maximum of three points can be obtained at each end of the floor.
- Run this drill without a set goal for your first time and take note of how many points the team scores in total. Then you can get a good idea of where they’re up to and set a goal for next time accordingly.
Variations:
Passing Line Change - Instead of the passing lines beginning on the extended free-throw line on each side of the court, each can start on the closest baseline between the middle and the side of the court.
Drill #15 - Partner Shooting
How the Drill Works:
Players take sets of 10 shots each. One person rebounds while the other shoots, back-pedals to half way and spots up again for the shot. Then they swap over.
Purpose:
The drill works on shooting while fatigued, allows your players to get up a lot of shots, and lets them work on their complete scoring game by shooting from all areas of the floor.
Setup:
- All players get a partner. If there’s an odd number the coach, assistant coach, or parent can rebound for one of the players.
- The player shooting stands at half court.
- The passer stands under the ring with a basketball.
- Coach tells the players which kind of shot to take. Either mid-range, three-point shot, one-dribble pull-up, or two-dribble pull-up, or floater.
Instructions:
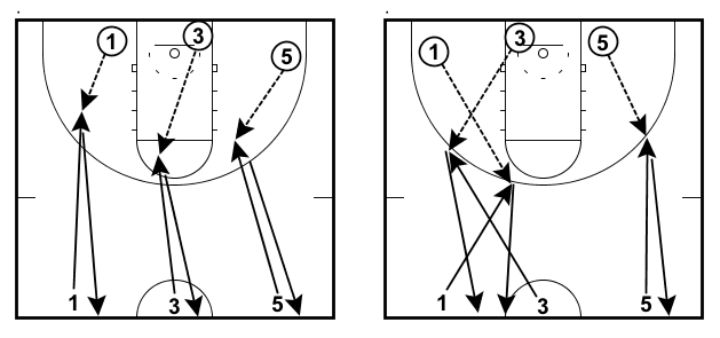
Change up where the shot is taken from between these five shots:
1. Mid-range shots.
2. Three-point shots.
3. 1-dribble pull-up shots.
4. 2-dribble pull-up shots.
5. Floater/layup.
- On the coaches call, the shooters at half way run in and receive the pass from their partner under the ring.
- Shooters take the shot and then back-pedal to half court while the passer rebounds the shot.
- The shooters continue this for the designated amount of shots the coach tells them to take.
- Once the shooter has shot the correct amount, the shooter and passer switch roles.
Scoring System:
- Shooter counts the amount of makes and rebounder counts the amount of shots taken.
- The player that makes the most amount of shots is the winner.
Variations:
Sideline - Players can backpedal to the sideline instead of the halfway line. This is perfect if you have three groups on each basket and they can rotate.
Different Shots - Make sure you’re changing the type of shot that players are taking after each round.
Made Shots - On a made shot players don’t have to backpedal to the sideline or half-way line.
Drill #16 - 5 Spot Variety
How the Drill Works:
All players grab a basketball and line up behind the same cone. Each player takes four different shots from 5 different cones. The core four shots are two layups and two jump shots.
Purpose:
A great drill for practicing a variety of shots from all over the floor. While I’m usually against lines, this drill moves quite fast and the players will never be standing for too long.
Setup:
- Place 5 cones three feet outside the three-point line at 5 different spots on the court. Both baselines, both wings, and the top of the key.
- All players need a basketball.
- All players line up behind the same cone.
- We don’t want more than 7 players in this drill at one time. If you have a lot of players, use both ends of the court.
- The players will do a full round of each shot before changing shots so you must tell them which shot they’ll be shooting first.
Instructions:
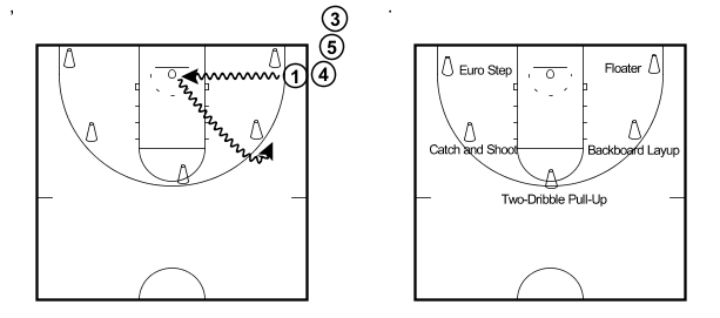
Each player will shoot five shots:
- A floater
- A layup off the backboard
- Two dribble pull-up shot.
- Pass to coach, receive the pass back for a shot.
- A euro step.
- All players are in the same line on a baseline cone.
- If the coach decides to start with a floater, the first player in the line will take a few dribbles in, take a floater, and make or miss will join the next cone.
- As soon as the first player in line shoots the ball, the next player starts dribbling in. This continues until all players have taken a shot from the first cone.
- When the last person is finished the first cone, the first player in line on the second cone will repeat what they did on the previous cone. This continues until everyone has shot from all the cones.
- The players end up on the first cone again, the coach picks the new shot, and the same routine happens. Do this for all four different shots.
Variations:
Add Different Shots - The four I mentioned at the start are the staples we use every time in this drill. But if you’d like you can add the different shots like the euro step, a three-point shot, a reverse layup, a power layup, etc.
All Shots on Same Cone - Instead of the players rotating straight onto the next cone, if you’d like they can just join the end of the same line and go through all the different shots before moving to the next cone.
Drill #17 - Drive and Kick
How the Drill Works:
Players will attack gaps in the defense with two hard dribbles before passing the ball out to the open shooter. This happens twice around the key before finally kicking the ball out for the open corner three-pointer.
Purpose:
This drill teaches your players how to explode off the dribble and attack gaps in the defense, forcing defenders to help, before passing it out to a teammate for an open shot. To keep the drill fun and competitive, the last player takes a shot from the corner.
Setup:
- One player under the ring with a basketball.
- One player on each corner and one at the top of the key.
- The rest of your players on the baseline waiting to come in.
Instructions:
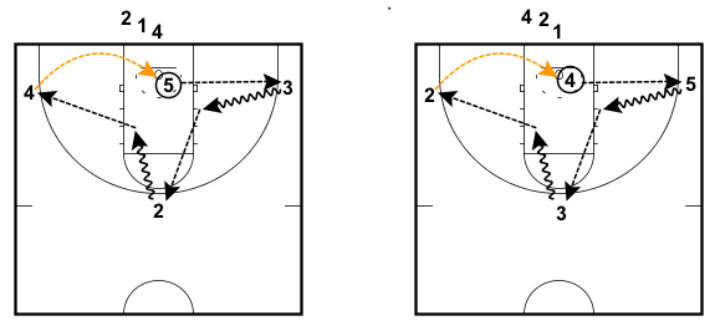
- The player with the ball under the ring (5) will pass it to (3) in the corner and then fill their place.
- (3) will attack the key with two hard dribbles before passing to (2) at the top of the key and then fill their place.
- (2) will also attack the key with two hard dribbles before passing to (4) and then will fill their place.
- (4) will take the shot from the corner and then join the end of the line.
- The next person in the line out of bounds will rebound the shot by (4) and pass it to the corner.
- Repeat for the required amount of minutes.
Scoring System:
The drill is run against a time limit. I usually run it for 3 or 4 minutes.
- The corner three-pointer is worth 3 points.
- If the rebounder catches the ball before it hits the ground a put-back is worth 2 points.
Variations:
Time - Vary the amount of time you run this drill depending on the age of your players.
Shot Distance - If you’re coaching young players you can move the shooting corner in a bit and allow them to shoot from the mid-range.
Change Direction - Make sure you change the direction up half-way so that players are practicing to be confident driving with either hand.
One Hand or Two Hand Passing - While I believe young youth players should certainly master the two-handed pass first, as players get older they must get used to passing with one hand off the dribble.
Practice Shot Fakes and Jabs - This is also a great drill to teach shot fakes and jabs before being explosive with correct footwork. Each time a player receives the ball get them to make a fake before driving.
Drill #18 - Titan Shooting
How the Drill Works:
Players begin the drill in three lines across the free-throw line on one basket. They must shoot, rebound their shot, pass it back to the same line, and then run a certain distance of the floor before returning to any of the lines. The team attempts to make a certain number of shots against a time limit.
Purpose:
A fantastic team conditioning shooting drill if you have a limited number of baskets.
Setup:
- Only one basket needed.
- Three lines of players. One on each high post and one in the middle of the free throw line.
- One basketball at the front of each line.
- The coach picks a line that the players must run to depending on the amount of players and age of the players.
Instructions:
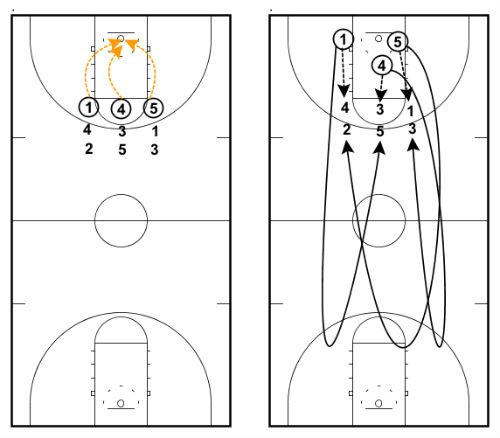
- The first player in each line shoots the ball, gets their own rebound, and passes it back to the same line they shot from.
- After passing back to the line, the player must run to the designated line chosen by the coach and then sprint back and join a different line.
- This process continues for all players until the time limit is up. Usually run for 2 - 4 minutes at a time.
Scoring System:
- The coach sets a target amount of makes before the drill and the players have a certain amount of time to achieve it.
- Each basket is worth one point.
- The coach should write down the score at the end of the drill and that can be used as the target to beat whenever you run the drill in the future.
Variations:
Time - I usually run this drill for three minutes but you can change the length depending on the level and age of your players.
Running Distance - Depending on the amount of players and the amount of space you have, you can vary the distance that players run between these four options:
a. No running. Join the end of the line after shot.
b. Run to half court.
c. Run to opposite free throw line.
d. Run full court.
Shooting Distance - If you have older players that utilise the three point shot, you can run the Titan Shooting drill from the three point line.
Competition - Instead of setting a target number for your whole squad, you can split the squad into two different teams and run the Titan Shooting drill at opposite ends of the floor against each other.
Drill #19 - Rainbow Shooting
How the Drill Works:
The drill consists of two basketballs and players shooting from different spots on the floor. Each time a player will pass to a shooter and then perform a half-circle around the back of the shooter before receiving the pass from the opposite line. Each player rebounds their own shot and passes the ball back to the line they received the pass from.
Purpose:
This is a great warm-up and shooting drill especially for youth basketball. It gives players a chance to shoot many repetitions from all different spots on the floor and it’s high intensity with everyone encouraging each other.
Setup:
- Two lines on the baseline at about the width of the key lane.
- Two basketballs. One to the first person in one of the lines, and the other to the second person in the other line (because the first person in the line without a basketball will be the first player to cut).
- Players divide up so that both lines have about an even number of players.
Instructions:
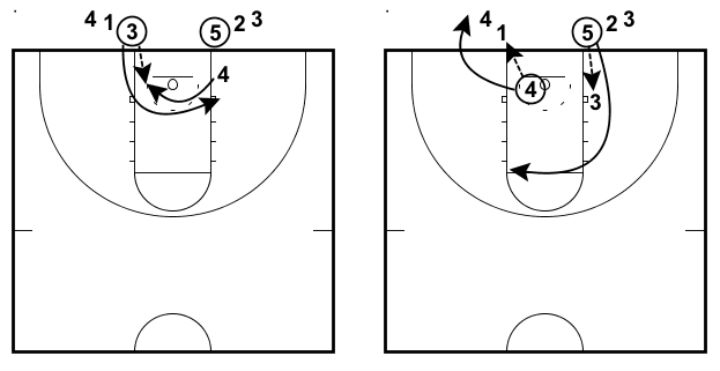
- The player at the front of the line without a ball does a half circle and receives the pass off the player at the front of the other line. The player that received the pass does a layup, rebounds the ball, and then passes to the line he received the ball off. Then joins that line.
- The player that passes to the shooter does a half-circle behind the shooter to the other side and receives the pass. Same as the first player, they do a layup, rebound, and then pass to the line they received off.
- This continues until all players have shot a layup from both sides or until you’ve made the required amount of shots from a particular spot.
- Once completed, they then move onto the next shot. I have 5 different spots my players must all shoot from twice. Your spots may be different depending on age.
a. A layup.
b. From the block.
c. From the elbow.
d. From the 3-point line.
e. Fake and drive.
Scoring System:
- For this drill the whole team scores together. The coach sets a number of makes from each spot and the players must count out loud as they make shots.
- For example the team might make 20 layups, 15 shots from the block, 10 shots from the elbow, 5 threes, and then 20 fake and drive layups.
Variations:
Different Shooting Spots - Don’t limit your team to the 5 examples I use above. You can incorporate shots from the wing, post ups, 1-dribble pull-ups, etc. Be creative.
Drill #20 - 31 Shooting Drill
How the Drill Works:
Each group will be competing against each other to be the first group to reach 31 points. The players will each take three shots - one from the 3-point line, one from outside the key, and one inside the key - and have the potential to score 6 points before passing to the next player in the group.
Purpose:
To work on shooting from all different spots on the basketball court while under pressure and at game speed.
Setup:
- Split the players you have up into 4 even groups and get them to form a line outside the 3-point line on each wing.
- 3 - 5 players in each team.
- First person in each line needs a ball.
Instructions:
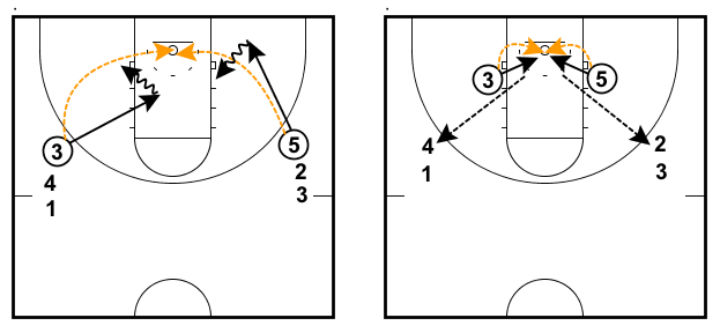
- On the coach’s whistle, the first person in each line will take a shot from the three-point line. If they make it, their team receives three points.
- Irrelevant of whether the shot is made or not, the shooter will get the rebound, retreat outside of the key, and take another mid-range jump shot. This shot is worth two points.
- The player will again rebound their shot, and this time they’re allowed to take a shot inside the key. This shot is worth one point.
- They then rebound the ball once more and pass it to the next player in the group who repeats the same process.
Scoring System:
- The game has no time limit. The goal is to score 31 points as a group. When a group reaches 31 points they call out ’31’ and are the winning team.
- The points are scored as follows:
- Three-point shot - 3 points
- Outside the key - 2 points
- Inside the key - 1 point - Each player has a maximum of three shots each time it’s their go.
Variations:
Youth Players - Instead of shooting from the three-point line, have each group start on the elbow. This means the first shot is from the elbow (worth 3 points), the second shot is from outside the key (worth 2 points), and the third shot is from inside the key (worth 1 point).
Different Target Amount of Points - Instead of playing to 31, you can play till 11, 21, or even 41.
