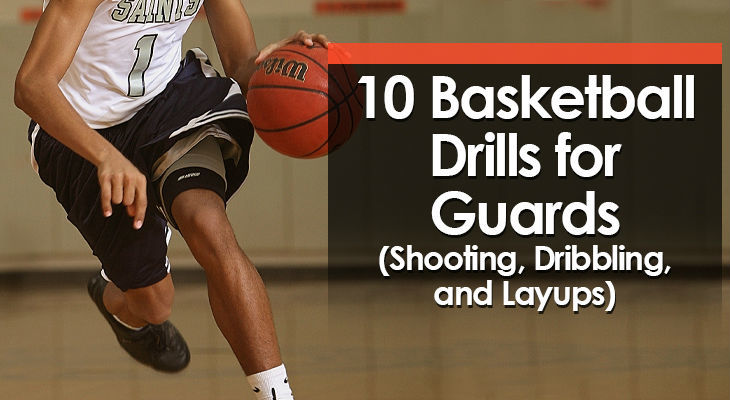
The best guards in basketball are highly skilled in specific areas of the game.
They're able to shoot from outside at a high percentage (midrange and three-pointers), they can beat any opponent with their dribble, and they can finish at the basket.
Below, I've put together 10 basketball drills for guards that will improve these important skills.
Use them during your next workout.
10 Basketball Drills For Guards
1. 2-Minute Floaters
How the Drill Works:
A player repeatedly attacks the rim for 2 minutes finishing at the basket with a floater. On each drive, they must vary the distance and angle of the shot.
Purpose:
This drill allows players to practice their floater. A move every player should be constantly trying to develop - especially guards.
You Will Need:
- One basket.
- One basketball.
Instructions:
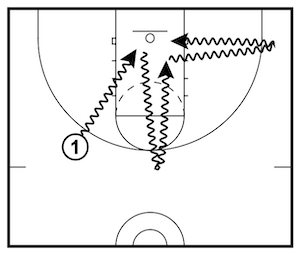
- Pick a starting position somewhere outside the three-point line.
- Drive towards the basket and finish with a floater. This involves pushing the basketball up in the air at a higher arc than usual from approximately 5 - 10 feet away from the hoop.
- Immediately rebound the basketball, retreat to anywhere outside the three-point line, and then attack and finish with a floater once again.
- The drill continues in this manner for 2 minutes.
Variations:
Time of Drill - If you want to go for longer than two minutes, go for it. If you want to decrease the time to only one minute, go for it.
Angle and Distance - As long as you’re retreating to random spots behind the three-point line, the angle and distance you release the shot from will vary naturally.
Type of Floater - Switch between finishing off one foot and 2-foot contact.
Coaching Points:
- Make sure you’re releasing the basketball high into the air to get over a defender’s hand.
- The drill should be done at a fast pace.
- For advanced players, practice using your weak hand to finish.
2. Advanced 1-on-1
How the Drill Works:
Two players play one-on-one from the designated spot on the court. The offensive player is only allowed to use a maximum of 2 or 3 dribbles before taking their shot.
Purpose:
This is one of the key basketball drills for guards to improve both offensive and defensive development. The player with the ball works on creating a good shot with limited dribbling, and the defender practices staying between their opponent and the basket and contesting the shot without fouling.
You Will Need:
- One basket.
- One basketball.
- Two players.
Instructions:
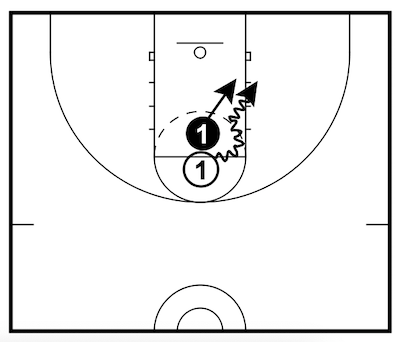
- The drill starts with one player on offense, and one player on defense.
- The offensive player starts on the free-throw line facing the basket, with the defender guarding them tightly in defensive stance.
- The drill starts when the defensive player hands the basketball to the offensive player.
- As soon as the handoff pass is made, the player on offense can attack the basket and attempt to score while the defender attempts to get a stop.
- The offensive player is only allowed to take two dribbles maximum.
- Once the offensive player has had 5 possessions, the two players switch roles.
- The drill continues in this way.
Variations:
Number of Dribbles - For less experienced players, limit the amount of dribbles to 3 instead of 2. Advanced players could even perform this drill with a maximum of 1 dribble.
Starting Position - Players can start from the three-point line instead of the free-throw line, and could also move the starting position to the wing instead of straight in front.
Scoring System - If switching every 5 possessions, there won’t be a winner / loser. But if the players choose to switch every possession, you can play to 7 or 11 points.
Coaching Points:
- If the defender commits a foul, the players start from the free-throw line once again.
- To get the most out of the drill, make sure you adjust the rules of the game depending on the age and skill level of the players. Refer to the ‘variations’ section for this.
- The offensive player should use fakes (shot fake, jab step, etc) to create space.
- Maximum of 10 seconds each possession.
3. Elbow Pull-Ups
How the Drill Works:
A player moves between the two elbows performing pull-up shots using one or two dribbles. This continues until they’ve made a set amount of shots.
Purpose:
This drill works on a shot all guards must have - a pull-up midrange shot at the elbow area. This is a dangerous area of the floor for guards to be in, and the shot can be utilised on the fast-break or in half-court play.
You will need:
- One basket.
- One basketball.
Instructions:
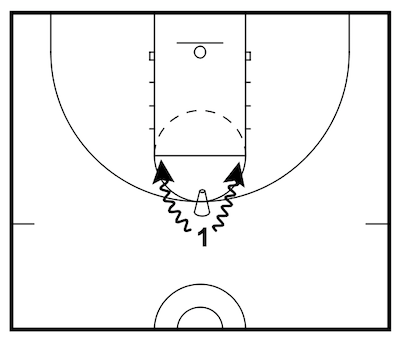
- Start at the top of the key with a basketball.
- Take one or two dribbles to one of the elbows and the raise up for a shot.
- If you have a rebounder, backpedal to the top of the key, receive the pass, and then perform the same shot from the other elbow.
- If you don’t have a rebounder, collect the basketball, return to the top of the key, and then perform the same shot on the other elbow.
- This continues until you’ve made a total of 20 shots.
Variations:
Shot Fake - Before you attack the elbow, use a shot fake to practice getting your opponent in the air or out of position.
Number of Made Shots - Instead of making 20 shots, you can make the number higher or lower depending on your current skill level.
Coaching Points:
- Make sure you’re not travelling on the initial step towards the elbow.
- If you’re adding the shot fake, stay down and only bring the basketball up to eye level.
- Make sure you’re retreating to the three-point line after each shot.
4. Fly-By Shooting
How the Drill Works:
Staying behind the three-point line, a player will pump fake, take one dribble to the left or right, and then shoot a three-pointer.
Purpose:
A key coaching tactic against great three-point shooters is to “run them off the three-point line” by sprinting out and leaping to block / distract the shooter. This drill works on side-stepping the defender and then shooting the open three-point shot.
You will need:
- One basket.
- One basketball.
Instructions:
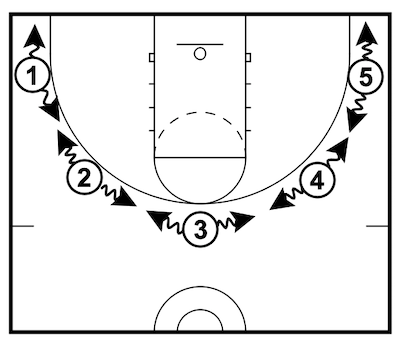
- Start behind the three-point line at the top of the key.
- Spin the basketball to yourself (or receive the pass from a parter), catch it, pump fake, and then take one side-step dribble either left or right before shooting the three-point shot.
- If you make the shot, repeat the process and take a dribble to the other side.
- If you missed the shot, repeat the same shot again.
- After you’ve made both shots, move to the next shooting spot.
- The goal is to make one shot dribbling to each side from each of 5 spots – top of the key, each of the wings and each corner (10 made shots in total).
Variations:
Seven Spots - If you want extra repetitions, shoot from the two slots as well.
Shot Distance - Young players can perform this drill from midrange, approximately 15 feet from the basket (free-throw range).
Number of Made Shots - If 10 isn’t enough for you, double the amount of made shots and make two shots from either side at each spot.
Coaching Points:
- Make sure you’re balanced on each shot. You don’t want to be fading away when shooting.
- When performing the pump fake, stay low and bring the basketball up to your eye level. And make sure to quickly look at the rim to get used to ‘selling’ the fake.
- Of course, this drill is easier with a partner to rebound for you. So if you have a friend, teammate, parent, or coach willing to help you out - use them!
5. Mikan Drill
How the Drill Works:
A player starts under the basket and makes layups using the backboard. After each layup, they rebound the basketball and alternate sides to score a set number of baskets.
Purpose:
This isn't usually thought of as one of the key basketball drills for guards, but it's important for everyone. The Mikan drill helps develop coordination, rhythm, and feel around the basket.
You Will Need:
- One basket.
- One basketball.
Instructions:
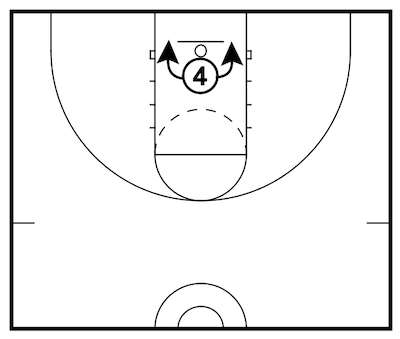
- Start under the basket with the basketball, facing the baseline.
- On the right side of the basket, make a layup with the right hand off the backboard jumping off your left leg (inside foot - outside hand).
- Quickly rebound the basketball and then make a layup on the left side of the basket with your left hand, jumping off your right foot (again, inside foot - outside hand).
- Continue in this manner by alternating sides with each shot until you’ve made 20 layups.
- After making 20 shots, start under the basket again but facing the half-court line this time instead of the baseline.
- Now repeat everything by making reverse layups until you make 20.
Variations:
Regular and Reverse - Make sure you practice facing both directions when running the Mikan drill. This will work on regular layups and reverse layups.
One Dribble - When working with young players, allow them to take one dribble before finishing the layup.
Coaching Points:
- As you get more comfortable, increase your speed by rebounding the basketball out of the net and finishing on the opposite side as quickly as possible.
- Do your best to keep the basketball at shoulder height for the duration of the drill.
- As you improve, practice adding some spin to the basketball by flicking your wrist.
6. Perfects
How the Drill Works:
A players starts shooting from spots close to the basket and then progresses further out. A certain number of perfect swishes must be made from each spot before moving back.
Purpose:
This is a great drill to start every practice / workout with. It focuses on developing correct shooting technique (especially arc) by taking shots close to the rim.
You will need:
- One basket.
- One basketball.
Instructions:
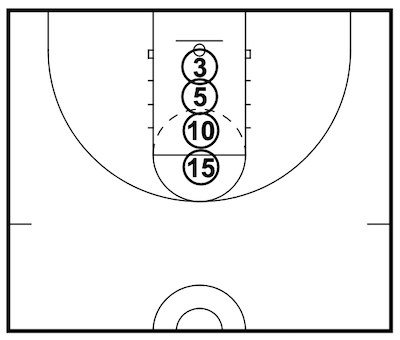
- From 3 feet away from the basket, shoot until you’ve made 10 perfect swishes.
- From 5 feet away from the basket, shoot until you’ve made 7 perfect swishes.
- From 10 feet away from the basket, shoot until you’ve made 5 perfect swishes.
- From 15 feet away from the basket (free-throw line), shoot until you’ve made 3 perfect swishes to complete the “perfects” drill.
Variations:
Shooting Positions - You can start in the middle of the key and progress along the middle towards the free-throw line, or change the shooting position with each shot, as long as you’re at approximately the same distance until the set number of shots is made.
Made Shots - Instead of counting perfect swishes, younger and inexperienced players can count regular made shots.
Coaching Points:
- The goal is to have picture-perfect shooting for on every shot.
- Make sure you’re completely extending your shooting arm, flicking your wrist, and raising up onto your toes on each shot.
- Great drill for learning how to shoot with great technique!
7. Plus / Minus
How the Drill Works:
Starting on 3 points, a player shoots free-throws in this fun drill. When they make a free-throw, they earn a point. But when they miss a free-throw, they lose two points.
Purpose:
Free throws are arguably the most important shot in basketball. This drills forces players to concentrate on making free throws and simulates the pressure of a game.
You will need:
- One basket.
- One basketball.
Instructions:
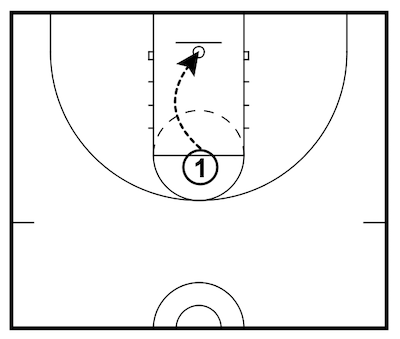
- The player shooting starts the game on 3 points.
- Start shooting free throws, making sure to complete your full free-throw routine before taking each shot.
- For every made shot, they get one point added to their total.
- For every missed shot, they lose two points from their total.
- The goal is to reach 10 points before falling to zero points.
Variations:
Starting Points - Vary the starting number of points depending on the skill and age level.
Plus / Minus – Vary the amount of points added or deducted on a made shot and missed shot depending on the skill level and age of the player.
Target Points - Change the number of points they’re shooting for depending on age and skill level.
Coaching Points:
- Take your time and make sure to complete your full free-throw routine on each shot. Just as you would during a real game.
- Focus on your shooting routine. Do your best not to focus on the pressure of each shot.
8. Stationary Two-Ball Dribbling
How the Drill Works:
A player performs several two-basketball dribbling drills for a total of 5 minutes.
Purpose:
These two-ball dribbling drills will improve hand-eye coordination, dribbling skills, and ‘feel’ for the basketball. Great to use before a game or workout.
You will need:
- Two basketballs.
- A small area. Either a basketball court, driveway at home, etc.
Instructions:
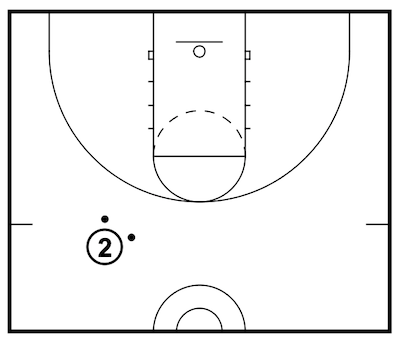
Pick the drills from the list below and perform each drill for 30-45 seconds:
a. Double Pound at Ankle Height
Dribble both basketballs as hard as you can at ankle height.
b. Double Pound at Waist Height
Dribble both basketballs as hard as you can at waist height.
c. Double Pound at Shoulders Height
Dribble both basketballs as hard as you can at shoulder height.
d. Double Pound Alternating
With the balls at a comfortable height, alternate the dribbling of each basketball.
e. One High/ One Low
Dribble one of the the basketballs at ankle height and one of them at shoulder height.
f. Double Wall Dribbling
Dribble both basketballs against the wall simultaneously at shoulder height.
g. Double V-Dribble in Front
Dribble both basketballs side to side in front of you simultaneously.
h. Double V-Dribble on Side
Dribble both basketballs from back to front beside you simultaneously.
i. 3 Dribble Double Crossover
Pound dribble both basketballs 3 times and then cross the balls over at the same time. Then perform another 3 dribbles before crossing over again.
j. 3 Dribble Through the Legs/Crossover
Pound dribble both basketballs 3 times and then cross one ball over in front of you and one ball through your legs at the same time.
k. 3 Dribble Behind the Back/Crossover
Pound dribble both basketballs 3 times and then cross one ball over in front of you and one ball behind your back at the same time.
l. Two Ball Figure Eight
Keeping the ball close to the ground, use your right hand to dribble one ball around your right leg and use your left hand to dribble the other ball around your left leg.
m. Kills
Pound both basketballs higher and higher starting from ankle height. When you reach shoulder height, ‘kill’ both balls stopping them a few inches from the ground before dribbling both balls back up again.
Work on these drills for about 5 minutes total.
Variations:
Time - You can change the length of the workout and the amount of time you spend on each individual dribbling drill.
Stationary Dribbling Drills - If two-ball drills are too advanced for the skill level of the player, consider performing similar drills with only one ball.
Coaching Points:
- Do your best to keep your eyes up throughout the drills.
- More dribbling drills here.
- Dribble the ball hard into the ground.
- Don’t get discouraged when you make mistakes. That’s a good thing! It means you’re pushing yourself outside of your comfort zone.
9. Suicide Shooting
How the Drill Works:
A player will run a conditioning suicide with the basketball and must make a free-throw line pull-up shot on each trip down the floor.
Purpose:
This drill is mainly used for improving level of fitness, but also work on shooting, dribbling, and making shots when fatigued and under pressure.
You will need:
- A full-size basketball court.
- One basketball.
Instructions:
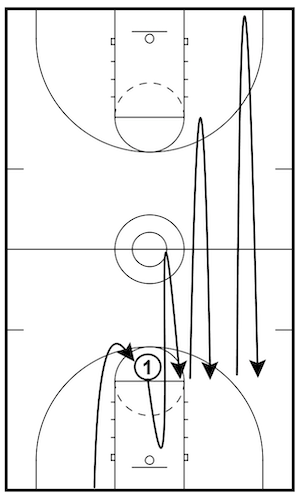
Rules: You must make a pull-up shot from the free-throw line after each trip down the floor: free-throw line, half-court, opposite free-throw line, and opposite baseline.
- Start on the baseline with a ball.
- Dribble to the free-throw line, then turn around and take a jump shot.
- If you make the shot, rebound the basketball, dribble to the next line (half-way), and then return to the free-throw line for another shot.
- If you miss the shot, you must rebound the basketball and shoot again.
- The drill continues in this manner until 4 shots are made (one after each of the different trips down the floor).
Variations:
Don’t Need to Make the Shot - If you’re only counting makes, the drill can result in the player running approximately 15 lengths of the floor if they’re a poor shooter. To make things easier, have them move on to the next line even if they miss the shot.
Shot Distance - Instead of using the free-throw line, use the three-point line for the shot location.
Coaching Points:
- To work on your ball-handling, only use your weak hand to dribble during the drill.
- This is a fast-paced and high intensity drill. Players should be running the floor hard when they’re moving between lines.
- Maintain focus and try not to get frustrated after missed shots.
10. Triangle Shooting
How the Drill Works:
A player takes three different shots from 5 spots on the floor. From each position, a player needs to make three shots before moving on to the next spot.
Purpose:
This drill works on a variety of shots from the perimeter. This includes shooting off the dribble from either direction, and off the catch.
You will need:
- One basket.
- One basketball.
- A player / coach / parents to rebound if possible.
Instructions:

- Start in the corner, on the 3-point line, with a basketball.
- You must make 3 shots from this position before moving on to the next one.
- The three shooting spots:
a) left one-dribble pull-up
b) right one-dribble pull-up
c) catch and shoot jump shot - There are 5 spots on the court (corner, wing, top of the key, opposite wing, and opposite corner) and you must make these 3 shots from each of them. Finishing with a total of 15 shots.
Variations:
Distance - Younger players can start from midrange distance, about 15 feet from the basket (free throw range).
Coaching Points:
- Pay attention to your shooting form on each shot.
- Avoid drifting sideways when on the one-dribble pull-up shots.
Conclusion:
While I did put together these basketball drills for guards specifically, there's no reason why players at other positions can't use them as well.
As basketball becomes more positionless, it's common to see the tallest players on the court handling the ball and shooting with range.
It's a new era!
No matter what position you play on the court, use these drills.
