All basketball coaches need a good variety of layup drills to pick from.
You need layup drills for mastering technique, individual drills to do at home, 1-on-1 drills, 2-on-1 drills, advantage / disadvantage drills, full team layup drills, and more.
These all work on different situations players will find themselves in during games.
In this blog post, I’ll give you drills that will fit any situation.
5 Important Layup Drills
The first two layup drills will set the foundation.
Players will learn how to execute a layup perfectly (drill one), and then they’ll learn a great individual drill to practice a variety of layups by themselves(drill two).
The next two layup drills are competitive.
I’ll show you a fantastic 1-on-1 drill that will simulate in-game pressure (drill 3), and then we’ll transition to a competitive half-court drill (drill 4).
Finally, we’ll look at a full-court layup drill (drill 5). This drill will improve your team’s fitness, passing, teamwork, and layup ability at full speed.
Let’s get started:
1. Technique Layups
How the Drill Works:
Players practice performing a layup off 1 step, 2 steps, using one dribble, and then practice full-speed layups from the three-point line.
Purpose:
Developing great layup technique for all players. It’s important that players learn the basic technique before they use them in practice and games at game pace.
Setup:
- All players need a basketball.
- One line of players starting on the block.
Instructions:
- The coach must explain and demonstrate how to perform the layup from each spot before the players practice.
- The players start on the block, take one step with the foot closest to the middle of the court, and finish the layup.
- Once a player completes their layup they join the end of the line.
- Continue this for a couple of minutes before moving back.
- Next players take one step back from the block to perform a two step layup (place a cone if you have one so the players always know where to start from). Players step first with their outside foot, then inside foot before laying the ball in.
- Lastly, the players all line up behind a cone at the three-point line and practice dribbling in and performing a layup.
Variations:
Both Sides - Players must learn how to perform a layup with the right technique using both their left and right hand.
Coaching Points:
- Layup technique for both sides of the floor is always step with the outside foot first, then finish the layup jumping high off the inside foot.
- Encourage your players to try and ‘swish’ the ball off the backboard so that they make the layup without the ball touching the ring.
- This is one of the best basketball drills for beginners who are just learning the game until they get a grasp of how to perform a layup.
2. Zig-Zag Layups
How the Drill Works:
A player repeatedly attacks the rim for 2 minutes finishing at the basket with a different variation of a layup every time. On each drive, they must vary the angle of the shot.
Purpose:
This drill allows players to practice their finishing at the basket with different variations of a layup.
You Will Need:
- One basket.
- One basketball.
Instructions:
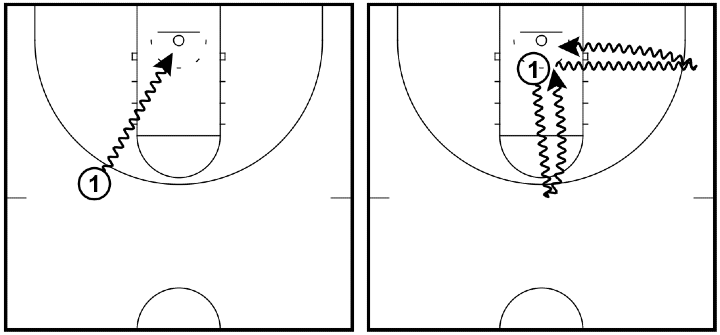
- Pick a starting position somewhere outside the three-point line.
- Drive towards the basket and finish using a variety of finishing moves:
- Layup
- Reverse layup
- Overhand layup
- Floater
- Jump stop and layup
- Euro step
- Inside hand finish
- etc.
- Immediately rebound the basketball after finishing, retreat to anywhere outside the three-point line, and then attack and finish using a different move.
- The drill continues in this manner for 2 minutes.
Variations:
Time of Drill - If you want to go for longer than two minutes, go for it. If you want to decrease the time to only one minute, go for it.
Angle and Distance - As long as you’re retreating to random spots behind the three-point line, the angle and distance you release the shot from will vary naturally.
Finishing - Mix and use all kinds of different moves to finish, and switch between one foot and 2-foot contact.
Zig-Zag Floaters - Only use floaters - switch between one foot and 2-foot contact.
Coaching Points:
- When shooting a floater, make sure you’re releasing the basketball high into the air to get over a defender’s hand.
- The drill should be done at a fast pace.
- For advanced players, practice using your weak hand to finish.
3. Around the Arc
How the Drill Works:
Two players start in the corner of the court, one on offense, one on defense. An offensive player dribbles around the 3-point arc and must attack and score against the defender, who can’t go inside the arc until the offensive player goes attacks.
Purpose:
Great one-on-one drill for both offense and defense that I first seen posted by Alex Sarama. The offensive player practices finishing at the hoop with a trailing defender pressuring them, while the defender practices contesting the shot from behind without fouling the shooter.
Setup:
- Split the team into two lines behind the baseline in the corner of the court.
- Players in the outside line start as offensive players, each with a basketball, and the players in the inside line start on defense.
Instructions:
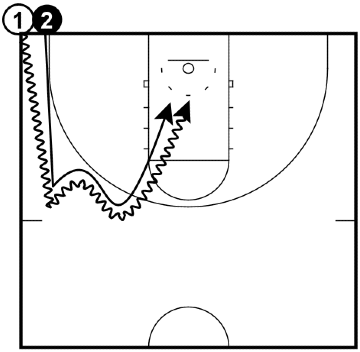
- The drill starts with an offensive player dribbling around the three-point arc, with a defender trailing them.
- At any point, the offensive player can attack and attempt to score. The defender isn’t allowed to cross the 3-point line until the offensive player does.
- The offensive player is allowed to make any dribble moves and fakes before they enter the 3-point area, and once they do, looks to protect the basketball and score while the defender attempts to contest the shot.
- As soon as they finish, they switch their roles and join the opposite lines from where they started, and the next pair starts their round.
- The drill continues in this manner for a set period of time.
Variations:
Left Hand - Players start in the opposite corner. Dribbling around the arc with their left hand, and then attacking the hoop and finishing with their left hand.
Coaching Points:
- The defender must trail the offensive player until they attack.
- Make sure the defense doesn’t enter the 3-point area before the offensive players do.
- Encourage the players to experiment and perform a variety of dribble moves in order to gain the advantage over the defense.
- Emphasize the importance of using your body to protect the basketball when finishing.
4. Half-Court 2-on-1
How the Drill Works:
The two outside lines are on offense and the middle line is on defense. The coach passes the basketball to an offensive player and all 3 players sprint up and around the cones and then compete in a 2 on 1 transition situation.
Purpose:
Allows the offensive players to work on decision making on the fast break and the defender to work on defending at a disadvantage.
Setup:
One cone in the middle of the court on the three-point line for the defensive line.
Two cones on the wings at the 1/3 court line (or half-way between half-court and the three-point line).
Three lines of players on the baseline in line with the cones.
The coach has one basketball.
Instructions:
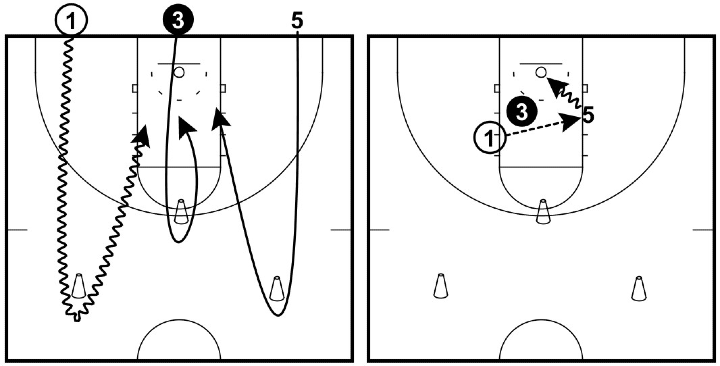
The coach begins the drill by passing to one of the offensive players. As soon as they catch it, all three players sprint up and around the cones.
Players now compete in a live 2 on 1 situation.
The drill doesn’t stop until either a made basketball or the defender gets possession of the basketball from a rebound or steal.
Players then pass the basketball back to the coach and join a different line.
Variations:
Distance of Cones - You can adjust the distance of the cones to be further away or closer to the basket.
3 on 2 Transition - Instead of 2 on 1, you can add an extra two cones and make it a 3 on 2 transition.
Coaching Points:
The offensive players must be attacking fast. Remind them that it’s a fast-break situation.
Offensive players should keep it simple. If the defender doesn’t step into your lane, score. If they do, pass.
The defender must protect the rim and try and cause confusion for the ball-handler.
Correct spacing is most important for the offensive team!
5. Russian Layups
How the Drill Works:
In this continuous drill, players will make a long pass down the floor and then sprint down the court and receive a pass from another line for a layup.
Purpose:
A great conditioning drill that works on long passing and finishing layups at full speed.
Setup:
3 basketballs. 2 basketballs in the corner the first player will start from, and 1 with the player in the opposite corner.
A minimum of 5 players are needed for this drill to work. Preferably more as it involves a lot of sprinting.
Instructions:
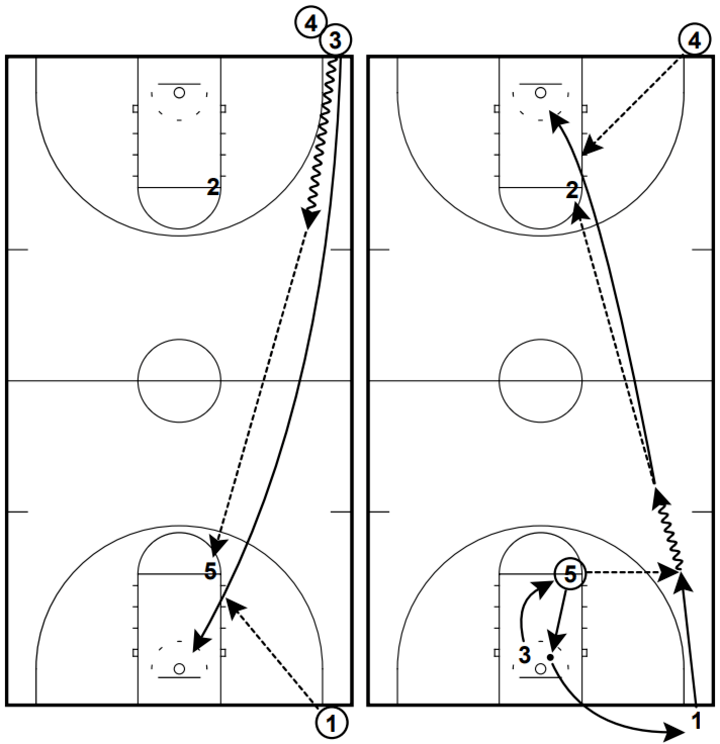
(3) starts the drill by dribbling until within passing distance of (5) and then makes the long pass.
(3) continues sprinting and receives the basketball from (1) for the layup.
(1) immediately sprints up the court after passing and receives the pass from (5) at full sprint and passes to (2) on the opposite high post.
After the first layup, without rebounding their own shot (3) quickly curls around and replaces (5) on the high post.
After making the pass to the player sprinting up the court, (5) rebounds the layup from (3) and passes it to the next person in line in the corner.
This same process continues at both ends of the court for 3 - 5 minutes.
Scoring System:
Set a target amount of makes for the drill. This will push the players to work as hard as possible to beat it as a team.
Variations:
Coach on the High Post - This drill can get very confusing if you have a young team. An easy way to make this drill simpler is to put a coach or parent on each high post. Then players just rebound their own shot and rotate through the one group at each end of the floor.
Ball Can’t Touch the Floor - For older players who can pass the full length of the court challenge them to not take a dribble before passing. The only time the ball should hit the floor is after the layup. Every time the basketball hits the floor the team loses one point.
Coaching Points:
As this is a drill that players can get confused in, it’s very important that all players are communicating and calling for the basketball.
Players must SPRINT up and down the floor.
Passes should be hard and flat. If the player has to lob the pass too much, tell them to take and a few extra dribbles.
Players should be taking long steps on their layups.
Conclusion
One crucial trait all youth coaches must possess when running layup drills:
Patience.
Despite how easy they might seem to you, there are many small things players must grasp before layups become second nature to them.
> When to start their steps
> Knowing which angle to attack
> Which part of the backboard to use
> Getting comfortable finishing against defenders
These are all subtle things that experienced players don’t even think about anymore, it all becomes instinctual after many years of practice and competition.
But for kids who are just learning the game, this process requires an incredible amount of focus.
Don’t be surprised when they miss A LOT of easy layups.
They’ll start to make them as they build on their experience.
