
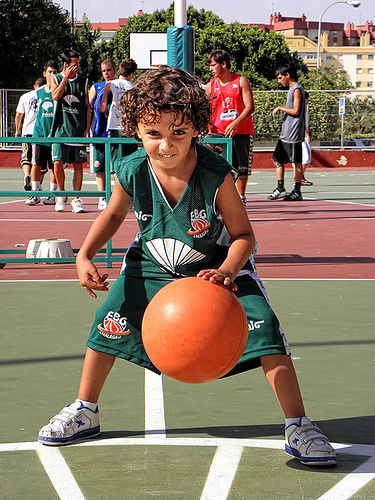
Children are out of control. We all know that. They sprint around the basketball court with what looks to us like an unlimited supply of energy. While this is fun and entertaining to watch, the out of control nature that these kids display leads to many turnovers on the basketball court. And coaches don’t like turnovers; do we?
These turnovers are due to their inability to stop under control. When players are not balanced and under control, they’ll often fall forward because of momentum resulting in a travelling violation. So it’s up to us to teach them to stop in a controlled, balanced position.
Easier said than done, right?
Not necessarily… As long as we start with the absolute basics.
First, let’s quickly go over the correct way to jump stop. Because if you don’t know it yourself, how could you possibly teach it?
What is a Jump Stop?
In its most basic form, a jump stop is when a player comes to a stop landing simultaneously on both feet in a controlled stance. The reason we want them to land on both feet at the same time is because then they can use either foot as their pivot foot. The jump stop is how players stop on a basketball court without travelling.
We want them to land in a triple-threat position. For those that are only new to basketball and its terminology, ‘triple-threat’ is when the player is in a low, balanced stance with the ball in their shot-pocket which makes them a threat to either shoot, dribble, or pass.
There are 3 main points I stress when teaching the jump stop to my players are:
- Knee’s bent – This keeps us low and balanced.
- Head up – Allows them to see the court.
- Small jumps into the jump stop – Jumping too high will cause them to land off-balance.
There are a few other things we can look at as they progress, but I believe these 3 are the most important.
How to Teach Your Players the Jump Stop
Teaching your players to jump stop should happen in four main steps.
- Teaching the correct landing stance.
- Jump stops without a ball.
- Jump stops after dribbling.
- Jump stops when receiving a pass.
In my years teaching young players footwork drills I have not found a better drill to teach all four steps of the jump stop than the drill ‘Go, Stop’. Boring name, I know. Blame the person who invented the game, not me.
The drill involves the players moving up and down the court in a controlled speed and stopping each time the coach either blows the whistle or calls out stop. It’s a fantastic drill to teach the basics of a jump stop.
Let’s go through the three four and the drill now.
Part 1 – Teaching the Correct Stance – Triple-Threat
The first thing we need to do is teach the players the position they will be in when they land on the jump stop. This stance is called the triple-threat position.
Here’s how to set up ‘Go, Stop’ and teach it:
1. Get into the starting position
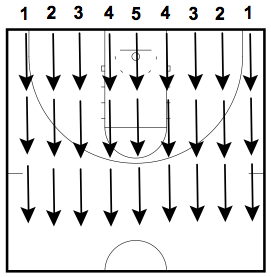
Get all your players lined up along the baseline without a basketball. We’re going to be focusing on their footwork to begin with and the basketball will only distract them.
If you have a large group of 12 or more ask your players to partner up and one of the them takes three steps in front of the other. If you have an even larger group of 20 or more you might want to consider running this from sideline to sideline instead of baseline to baseline. This gives them space.
2. Teach the players the triple-threat position
Once they’ve all got a bit of room it’s time to teach them triple-threat. The first thing I do is ask the players to show me the ‘triple-threat’ stance. This is because that’s the position they be in when they land on a jump stop. Depending on the age group and previous training, some will know it, some won’t. For those that don’t know it, we need to explain it to them.
The two keys to the triple-threat position are having our knee’s bent to keep us balanced and keeping our head up to see the floor.
Ask the players to get into triple-threat position and correct any technique flaws you can see. Allow them to relax and then tell them to get into triple-threat again. Go over this a couple of times until your players are used to it.
3. Explain triple-threat is the landing position
Now explain to them that when performing a jump stop they’re going to be jumping off one foot and then landing in that exact position.
Alright! Now they’re ready to get moving.
Part 2 – Jump Stops Without a Basketball
Teaching the players to jump stop WITHOUT a ball first is very important. The reason being is because it allows the players to focus completely on their footwork rather than the basketball.
Here’s how to teach it using ‘Go, Stop’:
- Begin the drill by explaining to the players what they’ll be doing. Jogging slowly down court until they hear a whistle signalling them to jump stop. When they jump stop they must land in the triple-threat position (low and balanced with their head up). Once they understand what to do it’s time to start the drill.
- Yell out ‘go’ to signal them to begin the drill and start jogging down the court.
- After a couple of metres yell out ‘stop’ to signal them to perform a jump stop. Make sure they all land in triple-threat position, wait for about two seconds and then tell them to go again.
- Repeat this process 5 – 6 times down the court.
Quick note – One of the most common flaws in this drill is players jumping too high on their jump stop. This creates a lot of momentum when they land causing them to fall forward. Stress that the jump only needs to be small so that they stay on balance.
Part 3 – Jump Stops After Dribbling
Once they’ve learnt how to jump stop without a ball, it’s time to make things a bit more difficult – we’re going to add a ball to the drill. Make sure each kid has a ball.
With a ball the drill will stay pretty much the same. Obviously the only difference is that they will be dribbling while they jog. Follow the structure of the first drill stopping your players about 5 − 6 times each time down the court.
Part 4 – Jump Stops Receiving a Pass
Receiving the pass is a bit different because it requires them to jump before catching the basketball.
To teach this, I get the kids to throw the ball a short distance out in front of themselves with backspin on the basketball. Once they’ve thrown the ball they take a couple of steps towards the basketball, and then they jump stop and catch the basketball in the air after the basketball has bounced and then land in triple-threat stance.
They continue throwing the ball out to themselves with backspin and then performing a jump stop on the catch all they way down the court.
Advanced – Pivoting and Fakes
Once your players have mastered the basics of the jump stop you can start to make it a bit more challenging for them. We can do this by adding pivoting and various other fakes they must do after the jump stop.
The four advanced moves that I recommend teaching are:
- Forward pivot.
- Reverse pivot.
- Shot fake.
- Jab step.
We must teach all of these moves to the players when they’re in the drills starting formation. That way they can learn the moves before the drill.
Forward Pivot – The forward pivot means the body of the players is moving forward around the pivot for. Make sure that the knees stay bent during the entire pivot.
Reverse Pivot – The reverse pivot means the body of the player is moving backwards around the pivot foot. This one is the hardest for young players to learn. Again, make sure that the knees stay bent during the pivot.
Shot Fake – Teach the players that when they shot fake the ball must not go above their head and they must keep their knee’s bent.
Jab Step – Teach the players that when they jab step it must only be short. If they jab step too long they’ll become off-balance and won’t be able to explode past their defender.
We incorporate these into the drill by calling out one of these pivots or fakes after the players have performed the jump stop.
Other Tips
- Before each time you run this drill ask the players the key points of the jump stop. Force them to think and remember the different aspects.
- Make sure the players aren’t jumping too high and landing off-balance.
- If you’re teaching them the advanced pivoting techniques makes sure they can pivot using both feet.
I hope you found this blog post and the drill helpful. It’s the exact process I use to teach all of my young players the basics of footwork which is unbelievably important at that age.
Don’t forget to share this with other youth basketball coaches that you think this might help and if you have any other drills and techniques you use to teach pivoting I’d love to hear about them in the comments below.